Take care with track breaks (red crosses) and note how some of the ULN2003 pins are bent up to allow tracks to pass under between the ESP03 and the H-Bridge driver.
This version is under development. It is DWiC in its simplest form with one (but also multiple) phone/tablet(s) controlling one loco controller.
An App needs to be written (refer to main menu) to manage multiple WiFi connections so one phome/tablet can control multiple controllers. This would not be dificult for a competent App programmer.
The HTML/Javascript code is at controller client html (Turn the ignition on (top left button) to begin operation! ) This can be modified for other locos by a competent programmer.
Circuit Diagram:
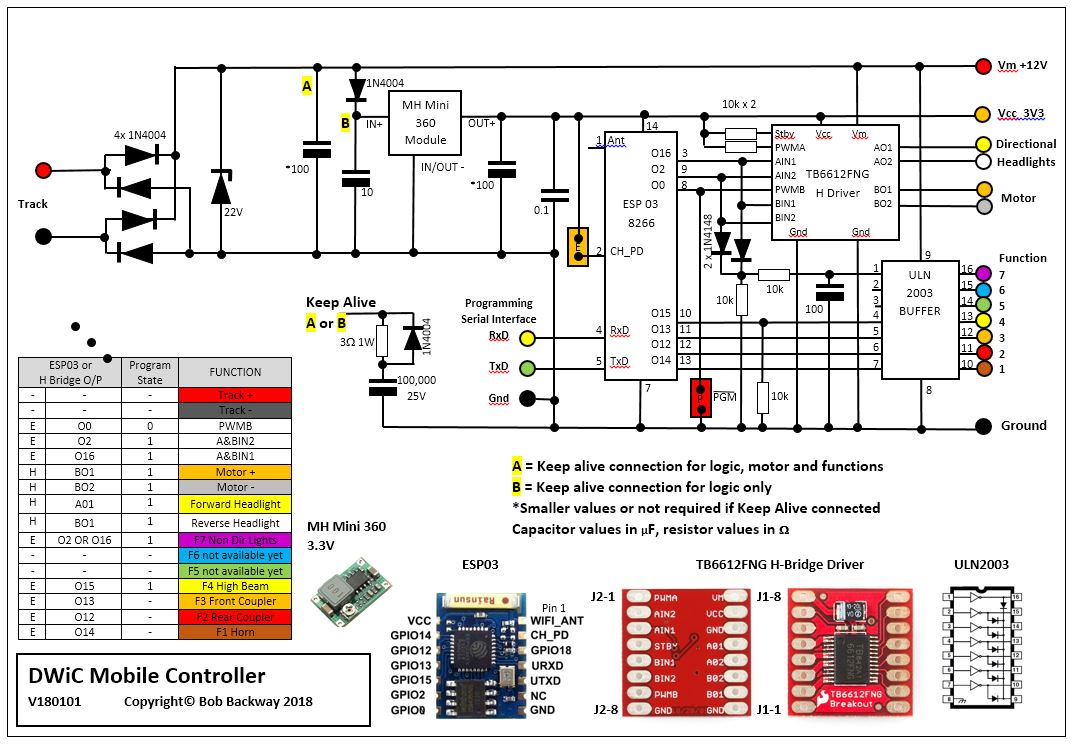
Parts list for Direct WiFi Controller (DWiC)
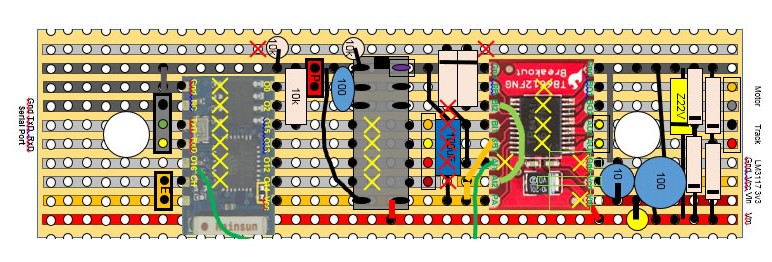
Below is an earlier version of the board layout just to give you an idea of how it looks. Note a surface mount design would be much smaller (similar to a DCC decoder).
Take care with track breaks (red crosses) and note how some of the ULN2003 pins are bent up to allow tracks to pass under between the ESP03 and the H-Bridge driver.

Binary files:
To quickly load binaries onto an ESP module you use Flasher(Win32) or Flasher(Win64) and a USB-serial interface such as this one from Worldchips. Connect Gnd to Gnd, Tx to Rx and Rx to Tx. Separately power board as the USB-serial interface can often not supply the current required.
To program controller:
1. Power controller
2. Run Flasher.exe.
In "Advanced" window of Flasher.exe check baud rate is 9600. Enter files into the "Config" window of Flasher.exe in the following order...
| File | Location |
|---|---|
| blank.bin | 0x7E000 |
| esp_init_data_default.bin | 0x7C000 |
| 0x00000.bin | 0x00000 |
| 0x40000.bin | 0x40000 |
| webpages.espfs | 0x12000 |
On completion of programming:
1. Remove enable jumper and then programming jumper
2. Replace enable jumper
3. Check WiFi working with phone or tablet, search for and connect to ESP WiFi server
4. Open your browser and enter IP address 192.168.4.1 into URL bar at top
5. The HTML page stored on board the loco should appear.
6. Turn on the ignition and run train
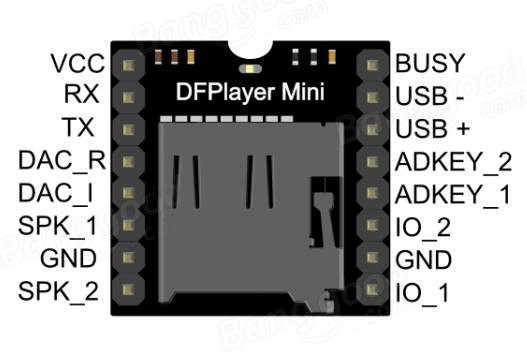
The cheapest way to add sound is to use the DF Mini MP3 Player module. At under $2, with 1W amplifier, TF card socket and simple control it is amazing!
Google for a full datasheet and discover the other amazing features it has. I got mine from Aliexpress.
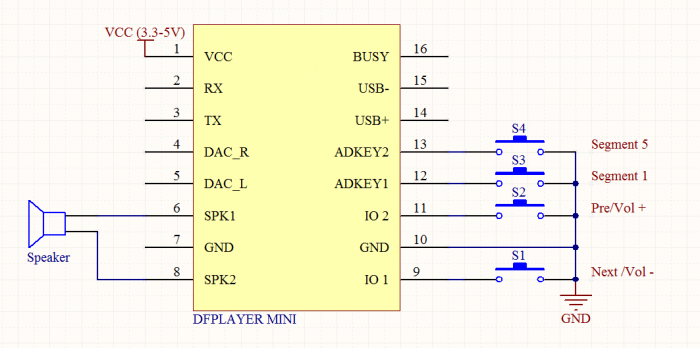
*In this simple application the horn buttons on your phone/tablet control the length of the sound so record a "long" horn/whistle sound
This MP3 player is capable of storing ~2000 sounds and has a very sophisticated serial control option. So one day...